How to Change the Network from Public to Private in Windows 10
In today’s digitally connected world, managing your PC’s network settings is critical for both privacy and functionality. One of the most common concerns users have is how to change the network type, from public to private, to ensure optimal security and accessibility. Whether you’re configuring a home network, connecting to office Wi-Fi, or securing your laptop at a coffee shop, understanding the Windows 10 network profile settings is essential.
This guide covers all available methods for changing your network type, explains the technical differences, and includes step-by-step instructions. We’ll also address commonly asked questions at the end for your convenience.
Why Network Profiles Matter in Windows 10?
When you connect to a new network, Windows 10 sets a network location type: either Public or Private. Here’s what they mean:
| Profile Type | Description | Use Case |
| Public | Your PC is hidden from other devices on the network. File/printer sharing is disabled. | Public Wi-Fi, hotels, airports |
| Private | Your PC is discoverable, and file/printer sharing is allowed. | Home or trusted networks |
The Windows 10 change network type action is often required when network discovery or file sharing isn’t working properly, or you need to access shared folders and devices like printers.
Method 1: Change Network Profile via Windows Settings (Simplest Way)
This is the most user-friendly method for most users.
Steps:
- Click on the Start Menu and choose Settings (⚙️ icon).
- Go to Network & Internet.
- Choose Wi-Fi (or Ethernet if using LAN).
- Click on your connected network.
- Under Network Profile, select Private instead of Public.
This updates your Windows 10 set network location instantly and is effective for most home and office setups.
Method 2: Use PowerShell (Advanced Users & Admins)
PowerShell offers precise control and is ideal for scripting or managing multiple systems.

Steps:
- Search and open Windows PowerShell as Administrator.
- Type the following to view current network profiles:
Get-NetConnectionProfile
- Note the Name of your network connection.
- Change to Private with this command:
Set-NetConnectionProfile -Name “YourNetworkName” -NetworkCategory Private
Using PowerShell ensures full backend control over Windows 10 network profile settings, especially in corporate environments.
Method 3: Use Local Security Policy (Windows 10 Pro, Education & Enterprise Only)
If you want a policy-based approach to enforce settings across users.
Steps:
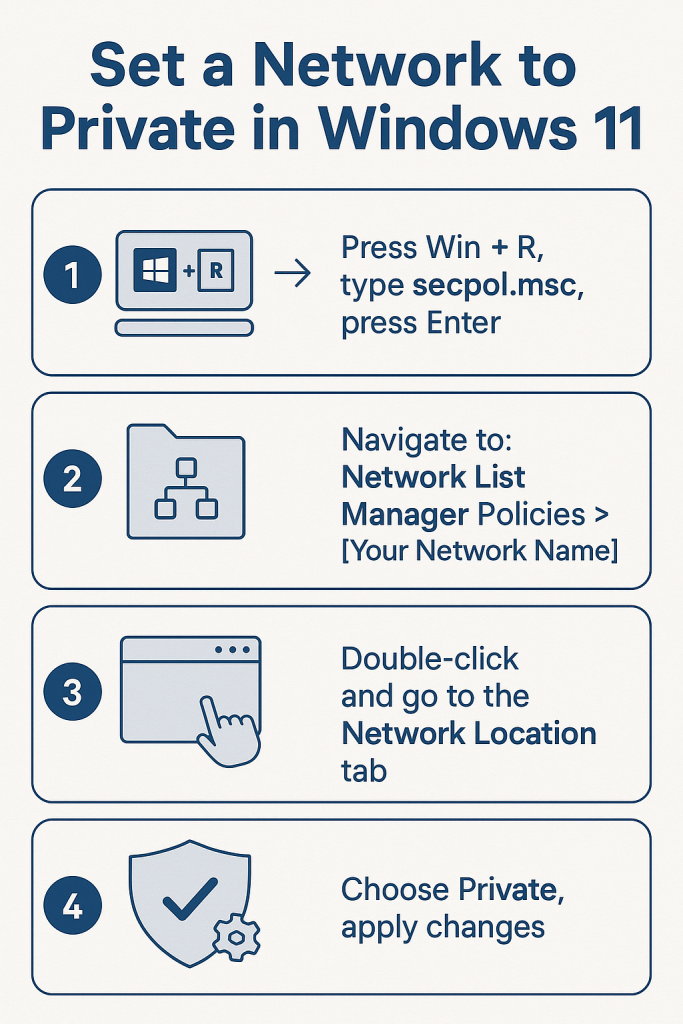
- Press Win + R, type secpol.msc, press Enter.
- Navigate to:
Network List Manager Policies > [Your Network Name] - Double-click and go to the Network Location tab.
- Choose Private, apply changes.
This method is not available in Windows 10 Home editions.
Method 4: Registry Editor (For Power Users & Custom Automation)
Only proceed if you’re comfortable editing the Windows Registry.
Steps:
- Press Win + R, type regedit, press Enter.
- Navigate to:
HKEY_LOCAL_MACHINE\SOFTWARE\Microsoft\Windows NT\CurrentVersion\NetworkList\Profiles
- You’ll see multiple GUIDs (folders). Click each and look for the ProfileName matching your network.
- Double-click Category and change the value:
- 0 = Public
- 1 = Private
- 2 = Domain (for corporate environments)
- Close the Registry and reboot.
Backup your registry before editing. This gives deep access to Windows 10 switch network type.
Method 5: Group Policy Editor (For Domain or Managed Devices)
Perfect for IT administrators managing multiple endpoints.
Steps:
- Open the Group Policy Editor:
Press Win + R, type gpedit.msc, press Enter. - Navigate to:
Computer Configuration > Windows Settings > Security Settings > Network List Manager Policies
- Select your desired network.
- Set the location type to Private.
This approach integrates well with Active Directory for enterprise-wide enforcement of Windows 10 Wi-Fi network type change.
How to Verify Network Profile Status?
You can confirm your current network status via:
Control Panel
- Go to Control Panel > Network and Sharing Center.
- Check the profile listed under your active network (Private or Public).
PowerShell:
powershell
Get-NetConnectionProfile
This shows:
- InterfaceAlias
- NetworkCategory
- IPv4Connectivity
This helps confirm the result of your Windows 10 change network type operation.
Windows Firewall Behavior Based on Network Type
Windows Firewall adapts based on your selected network type:
| Network Type | Inbound Connections | File & Printer Sharing | Discoverable Devices |
| Public | Blocked by default | Disabled | Hidden |
| Private | Allowed (with settings) | Enabled | Visible |
Understanding this helps optimize performance and security depending on your use case.
When Should You Use Private vs Public?
| Scenario | Recommended Type | Reason |
| Home Wi-Fi | Private | Enables device discovery and printer sharing |
| Office LAN | Private | Collaboration and resource sharing |
| Airport/Hotel Wi-Fi | Public | Maximum security; no device discovery |
| Shared Café Internet | Public | Protects your device from others |
Automating Profile Switching
For advanced users, you can automate profile switching based on location or SSID using Task Scheduler + PowerShell.
Example Script:
powershell
$net = Get-NetConnectionProfile
if ($net.Name -eq “HomeWiFi”) {
Set-NetConnectionProfile -Name “HomeWiFi” -NetworkCategory Private
}
Set this to run at login via Task Scheduler for automatic Windows 10 Wi-Fi network type change.
Final Thoughts
Changing your network from Public to Private in Windows 10 isn’t just about functionality, it’s a matter of security and control. Whether you’re a casual user or a network administrator, these multiple approaches offer you flexibility in how to manage your system.
No matter your method, always double-check your changes using PowerShell’s Get-NetConnectionProfile or Control Panel for verification. With this knowledge, you’re equipped to confidently manage your Windows 10 network profile settings anytime, anywhere.
Why is my network stuck on Public?
Third-party firewalls or group policies may prevent changes. Try PowerShell or Registry methods
Is it safe to switch to Private on Wi-Fi?
Yes, if you’re on a trusted network like home or office. Avoid setting public Wi-Fi as Private.
Can I use PowerShell in Windows 10 Home?
Absolutely. PowerShell is supported in all Windows 10 editions and is ideal for Windows 10 switch network type tasks.
Where do I find Windows 10 network profile settings?
Go to Settings > Network & Internet, then select your active network.
Does changing to Private impact performance?
It doesn’t affect speed, but enables device discovery and may allow more incoming connections.

Hi, I’m Ethan Cole, the writer behind techmogi.com. I cover tech topics like how-to guides, digital tools, social media tips, and everyday tech fixes. I enjoy breaking down complex information into simple, useful content that anyone can understand. If you’re looking for clear, no-nonsense tech advice, you’ll feel right at home here.